 Yes, yes you’re ready to start a blog to help you market your creative business. A blog is an important part of any business, in my opinion. It helps any business when it comes to marketing, building an audience, generating more traffic, and gaining more sales.
Part 1: Which Website Platform should you use?
Before I get into this post, I want to share with you a few options. First of all this blog post is how to start a blog using WordPress from WordPress.org (not the free site at wordpress.com). Now WordPress has changed a lot since I started using it to create my websites. The biggest update which happened around 2018 made WordPress site owners either love the change or hate it. It was a total game-changer. This is partly why I haven’t done a start a blog tutorial before. I’ve been asked about starting a blog, & I talk using a blog for your business often, so I figured it’s about time I did one & I hope there are no more big changes with WordPress around the corner. You see starting a blog with WordPress can get a bit technical depending on how you are when it comes to learning something new.
You see some people are all for the getting stuck in. Some people will give it a try and have someone ready to call when they get stuck. An there’s those who just don’t want to be hands-on and want it super simple & that’s is totally fine.
If you don’t mind getting stuck in and learning something new then I say really give WordPress a try even with the new update. I will show you what this major update looks like in a bit. As its this part I believe it will help you decide if you will want to use WordPress to create your blog or not.
If you decide that WordPress is a bit too much then I recommend 2 other website platforms. Shopify or Squarespace, now these are monthly paid platforms but the creation of putting together a site is much simpler as they use a drag and drop system. Check them out see what you think & what you are comfortable with.
At the end of the day, I simply would like you to have your own presence online to help your creative business. I know I am all about WordPress because you get more control, as it’s on your own hosting etc.. But if WordPress is not for you then go with a website platform that can help you get that blog up and running.
Also if you do decide to go with either Shopify or Squarespace, you will not need to go through the “Buying Hosting for your Blog” section. As these website platforms use their own.
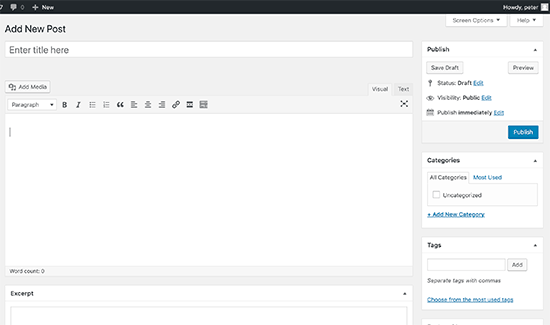
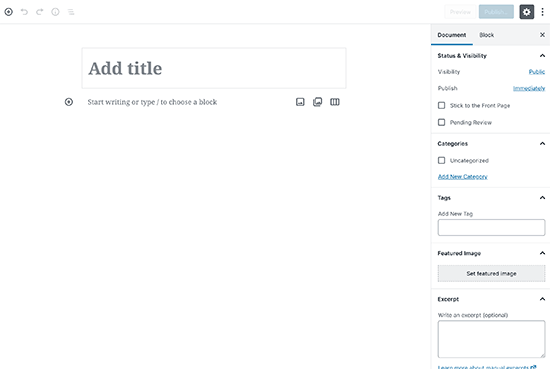
Ok, before I said I would show you the big update that divided the WordPress site owners. Image A below is how the old content area use to look. This is the space for you would type. In image B it was updated to look like the image below. Yeah, it’s totally different, isn’t it? Like nothings hardly there. This was a shock to many because the old content area was ready for you to type. The new content area you have to build it before you can even type anything.
Now there is a plugin that I have been using that allows me to use the old-style content area. However this plugin will only last until 2022, so after that, you will have to use the new style on the content area. Unless WordPress decides otherwise, as it’s their own plugin.
I will be showing you how to use the new content area in WordPress, as its the best way to go in my opinion. But I will also share with you the plugin I have been using, so you have the option to use it too. I personally have switched to the new way, it’s a learning curve though. However, there are some new things I want to be doing with my blog and this new style is the ideal way to help me do that.
Anyhoo that’s enough talk lets get into this tutorial. I recommend you read through the whole post first with your fav beverage. Get the lowdown on what you gotta do, what sites you will be using, do your research, etc… Then take action, as you will know what to expect. O.k let do this.
Part 2: Your Domain Name
Yep, you got you to start with a name my friend. This the hardest part to do if you are not going with your already business name or your own name. If you have to think of a name that this is where you need time, a pen & notebook and start brainstorming. You have to be careful with what you choose as it will be with you long-term. Yeah, you could change it down the road like I did but it takes work redirects ling traffic links to the new domain name. As you don’t want to lose all the traffic you have been working so hard to build. Then you have to change social media names etc., yeah its a lot.
Also bear in mind if your business is about saying “keychains” and you called your site “keychain empire”. Then down the road, you start working with necklaces or headbands. It will be hard to incorporate that in your marketing as your business name will reflect the world that you are all about keychains. So it’s important you carefully choose that name that you can have for a long time and it allows your business to be flexible & able to evolve.
When you have got the name you want to you need to do 2 things before you commit to it.
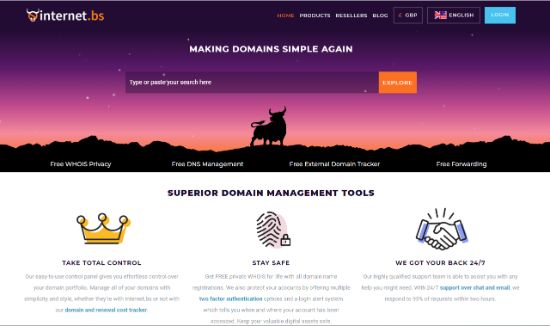
1/ Check this site: Internetbs.net to see if it’s actually available for purchase.
2/ Check these social platforms out to see in your name is available (unless you already have them). Twitter, Facebook, Youtube. Instagram & LinkedIn.
If all is good & the name is available to buy & you got the names you wanted over on social media platforms then its time to buy your name at Internetbs.net. I use this site to buy all my domain names. Note: Never buy your domain name ad your website hosting from the same company. If the company goes belly up to your stuck. Always keep them separate.
Go through the steps to check and to purchase your domain name by clicking the image below to get started.
Note: when you come to pay tick the box private whois. This helps protect others from knowing your personal information about you.
Part 3: Buying Hosting for your Blog
The company I used for my hosting is Unlimitedwebhosting.co.uk they are awesome. Their customer support is second to none. They are based in the UK, which is where I am based if you did not know. If you are located in the USA or others & want to have a global company you could use BlueHost. Even though the company I use will have customers around the world I understand you may prefer a US-based company. If you do decide to use Bluehost I will get a small commission when you sign up. But I do recommend using Unlimitedwebhosting.co.uk.
Paying for your hosting via Unlimitedwebhosting.co.uk
Follow the steps the website shows you to set up purchase your website hosting. Plus you get the 1st month for only £1. After you complete this section they will send you an email with a link to the Plesk Desk (ie the control station where you set up your site) along with your username & password. With this information, you can move on to the next step of setting up your WordPress site.
Part 4: How to Point Your Domain Name to Your Web Host
We need to do this before we get started on setting up your new site
Use your plesk desk details you got emailed to login. Now, before we start to set up your WordPress site we need to connect your website & domain together.
This part may be a bit technical but you will be o.k. To connect your Internetbs domain name with your Unlimited Webhosting account, follow these steps:
- Log into your Plesk desk UnlimitedWebhosting account.
- Under Websites & Domains & your website domain name look for DNS Settings & click on it
- Look down the 2nd column “Record Type ” & find NS, you will see 2 of them. You will see something like this: ns1.unlimited.uk.net (yours may be slightly different). Now keep this page open we are going to come back to it
- Now login into Internetbs.net where you purchased your domain name
- Find your domain name & click on it
- Under Advanced Setting halfway down the page click on the cog icon labeled Modify Domain Setup
- Under Nameservers you will see a white box, copy & paste the 2 ns1.unlimited.uk.net (yours may be slightly different) from your plesk page (remember the page we left open) into this box. When done click Add Nameserver
- And you are done.
Part 5: Setting up your new WordPress Site
This video will show you the steps to set up your new WordPress site
Setting up a business email address
Adding plugins & themes from within WordPress
In this video, I’ll show you how to find & add plugins & WordPress themes from within WordPress. As you may find this option easier and more convenient to do.
What plugins should you install
Here is a list of the recommended starter plugins you should install. As you start to use WordPress for your business you can explore other plugins.
Updraft – is to backup your WordPress pages and posts. You can choose whether to have the backup file emailed to you daily, weekly or monthly. I have my backup sent to me daily.
All In One WP Security – All round best WordPress security plugin
WordPress Database Backup – Backup of your WordPress database
Yoast SEO – The first true all-in-one SEO solution for WordPress, including on-page content analysis, XML sitemaps and much more.
Classic Editor – Enables the WordPress classic editor and the old-style Edit Post screen. We will talk more about this later on
Which WordPress theme should you use
Themes vary so much depending on your business type, what you want from your site|blog etc… There are a lot of free themes you can view via WordPress, or you can do a search for “free WordPress themes” & see lists of them. I used to use free WordPress themes but I found myself always tweaking it to get it to do or look like what I wanted. I don’t mind learning the new to get the results I want so it was ok for me for a while.
After many years of using free themes, I invested in a premium theme called “Imprezza” & it was the best decision I made. I still tweak it here & there but the theme is so versatile & flexible that it can pretty much do whatever I want. I will say it can work for any business. A little messing with images to fit your business, add your brand colours, set up pages to your liking & your good to go.
The best thing about investing in a theme is that you get support from the developers of the theme. It’s always being updated and the support team is great. You can take a look at the theme I use here at Themeforest. Click the preview live bottom and you can play and explore the theme. Themeforest has many great themes to choose from so have a browse if you wish.
Sitemaps help the search engines crawl your content a lot easier. PLus the places I will share for you to sign up to will help you get to know & see what Google & Bing sees when it comes to your site and the search engines.
Go back to the above video to install your chosen theme.
Part 6: Google needs to Find Your Website
To make sure the search engines like Google can find your blog, let’s make sure the following areas are unchecked:
- In the left-hand pane of your WordPress dashboard, hover over Settings & click Reading
- Make sure that “Discourage search engines from indexing this site” is unchecked
Part 7: Create an XML Sitemap to submit it to Search Engines
A sitemap helps Google & other search engine navigate around your site. It shows them all your pages, posts, videos & any other files on your site. An how they are connected together.
We need to create a sitemap so we can tell Google your website exists
How to Create an XML Sitemap
If you follow my recommendation to install the Yoast SEO plugin then this is going to be super quick.
In the left-hand pane of your WordPress dashboard, hover over SEO & click General
Then click the Features tab. Now scroll down to the XML sitemaps option and make sure the switch is toggled to On
Click the question mark icon next to XML sitemaps. Then click the See the XML sitemap link. Your sitemap will open in a new window. Copy the URL in the address bar and save it.
Part 8: Submit your new website to Google Search Console
Go to Google Search Console and sign in using your Google account
To add your new website click “Add property” & follow the steps to get up website setup in Google console. When you are done continue to submit your sitemap.
To submit your sitemap
Under Index, click the Sitemaps option
In the Add a new sitemap section, enter the URL you saved earlier and click Submit button. All done
Part 9: Back to WordPress to Change Permalinks Structure
By default, WordPress sets the links on your blog to the following format:
- yourdomain.com/?p=123
We don’t want to use this format. We want to to work better for seo purposes & make it more helpful to readers. Do this before you get started on creating any content on your blog.
This is what you need to do to change it
In the left-hand navigation pane, hover over Settings & click Permalinks
Now under Common Settings, set the option to Post name
Part 10: Writing your Post
Remember way back at the beginning of this post, I spoke about the area you type your content in. An how it’s completely changed & this may be the reason you choose not to use WordPress. Well, we are going to get into this now.
For image A which is the old set up here is a detailed tutorial on how to use it How to write posts using the old-style content area. Also to use the old style you will need to install & activate the Classic Editor plugin.
Now I’m going to show you how to use the new style content area works – Image B.
To start, you need to create a new post.
You do this by going to the left-hand panel of your WordPress dashboard, hover over Posts & click Add New
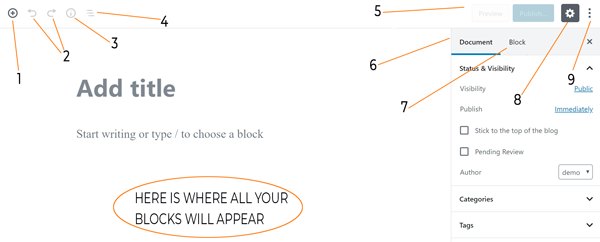
1 – Lets you add new blocks
2 – Undo/redo buttons
3 – Content structure (word count, headings, paragraphs, blocks)
4 – Block navigation (a drop-down displaying all the block types used in the post)
5 – Lets you access a live preview of your post or publish/update your post
6 – Gives you access to document settings, covering things like categories & tags, featured images, etc. This is similar to the current sidebar in the WordPress editor
7 – When you have an individual block selected, this gives you access to settings that are specific to that block
8 – Hide the sidebar
9 – More editor settings
How to Add a Block in the Block Editor
Click the plus (+) sign in the top-left corner.
Choose the category and the type of block you want to add:
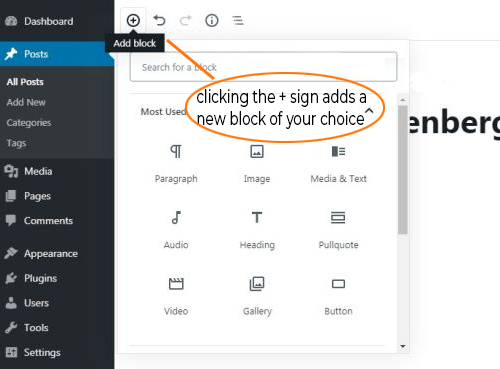
Each block can be edited, deleted, saved as reusable, moved up or down. The 3 dots above any block you create to access these functions.
Like I said it’s a learning curve. Once you get the hand of everything you will be creating posts & pages without thinking. Plus you also have the option to use the Classic Editor plugin to us the old style.
11. Building Your Email List
I talk about this often & for a very good reason. With an email list, you can stay connected to those who chose to join your email list.
You will need your new business email address you set up earlier. If you did not do that step go back to part 5 (Setting up a business email address) & complete it. All emailing marketing services will require a professional business email address before you can use their services.
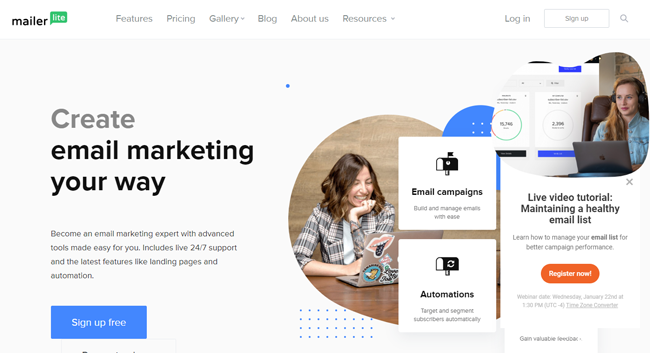
For email marketing services I use MailerLite, it is free for users with 1,000 or fewer subscribers. So this is ideal as you are starting out. Plus as you grow they offer great prices for a larger number of subscribers.
Get signup to create your first opt-in form & add it to the front of your website to get started. Then create a welcome email to introduce yourself & to give them the freebie if that’s what they signup for via your form.